How To Install Minikube on EC2 Ubuntu 22.04 LTS — 2023
A step-by-step guide to installing local Kubernetes

Minikube is an effective and simple tool on which you can start learning, developing, and deploying applications on Kubernetes in your local.
There is a simple step-by-step guide provided by minikube official documentation on the internet still many have faced issues while installing it on the Ubuntu 22.04 LTS version.
In this article, I have mentioned a detailed guide with screenshots that you can try blindly and spin up your local Kubernetes cluster within minutes.
Let’s Begin!
Table of Contents
1. Requirements
2. Pre-requiste Installations
3. Minikube Installtion on EC2
4. Sample Nginx Deployment
Requirements
2 CPUs or more
2GB of free memory
20GB of free disk space
Internet connection
Container or virtual machine manager, such as: Docker, Hyperkit, Hyper-V, KVM, Parallels, Podman, VirtualBox, or VMware Fusion/Workstation
Note: In this article, I am using a EC2 machine with Ubuntu 22.04 LTS version

Pre-requiste Installations
Before installing minikube we had to make sure all the pre-requites are installed.
Docker
Kubectl
Update the apt package index and install packages to allow apt to use a repository over HTTPS and add GPG keys.
sudo apt-get update

sudo apt-get install \
    ca-certificates \
    curl \
    gnupg \
    lsb-release
sudo mkdir -p /etc/apt/keyringscurl -fsSL https://download.docker.com/linux/ubuntu/gpg | sudo gpg --dearmor -o /etc/apt/keyrings/docker.gpgecho \
  "deb [arch=$(dpkg --print-architecture) signed-by=/etc/apt/keyrings/docker.gpg] https://download.docker.com/linux/ubuntu \
  $(lsb_release -cs) stable" | sudo tee /etc/apt/sources.list.d/docker.list > /dev/null

Now let us install Docker Engine

sudo apt-get update
sudo apt-get install docker-ce docker-ce-cli containerd.io docker-compose-plugin
sudo service docker start
If you have followed the steps correctly until now, the status of your docker should look like this:

Kubectl installation steps/commands
curl -LO "https://dl.k8s.io/release/$(curl -L -s https://dl.k8s.io/release/stable.txt)/bin/linux/amd64/kubectl"sudo install -o root -g root -m 0755 kubectl /usr/local/bin/kubectlkubectl version --client
kubectl plugin will help us to deal with the kubernetes commands easily on the minikube.

Minikube Installation
We have met all the pre-requested requirement and installations, now let us install minikube.
curl -LO https://storage.googleapis.com/minikube/releases/latest/minikube-linux-amd64
sudo install minikube-linux-amd64 /usr/local/bin/minikubeminikube start
If you face a permission denied error after minikube start command same as shown in the below image make sure to add docker as a sudo

Author’s EC2 Screenshot — #5
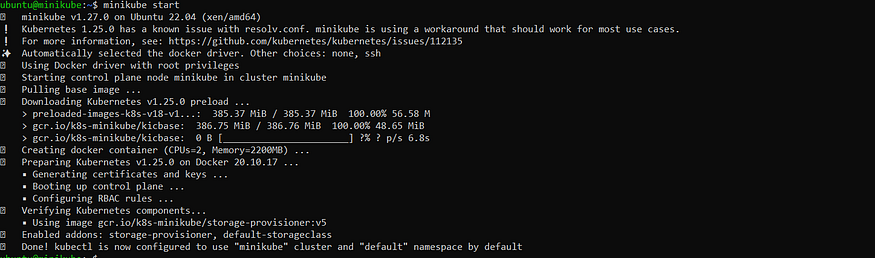
After successful start you will see the output like below
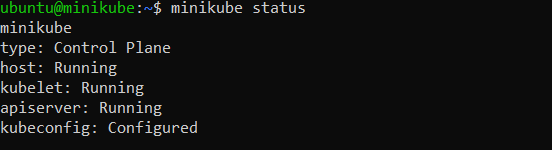
You can also see the status of the minikube by using minikube status command.
As we have already installed kubectl plugin earlier, we will run now a few commands just to verify everything is working fine.
kubectl get ns # To check all namespaces
kubectl config current-context # To check current context of the cluster

If your output is similar to mine that means minikube cluster is working fine and you can now run your applications and deployments easily.
Let us run and deploy one sample application on minikube cluster.
Sample Nginx Deployment
In order to become pro-efficient in the Kubernetes it is advised to get aware and used to different Kubernetes commands both declarative and imperative.
Also if require you can start a dashboard also using the below command.
minikube dashboard
I am going to deploy nginx using imperative command and will also create a service of it so that we can see the nginx running in a browser.
kubectl run nginx --image=nginx
kubectl get pods
kubectl expose pod/nginx --port=80

In order to see the nginx running in the browser there are two ways, either we do a portforwad and verify or we deploy the service as node-port and using minikube service command we see.
I am using a port-forward to verify, by binding 8080 port of machine to 80 port of the pod.
kubectl port-forward svc/nginx --address 0.0.0.0 8080:80

Hence now we can say our minikube is working fine and we now can develop and deploy applications easily on it.
Share this article with your friends and colleague who are struggling to install minikube.
Thanks for reading.